


[furryclan] tactics
Using a Rolling Point and providing effective cover - [GhostRider]
The theory
The designation of a Point Man on an entry team can be just as crucial, if not more so, than the designation of the other positions such as the Element Leader, Rearguard, Breacher, etc. It is the Point Man that will communicate to the team just what types of obstacles are ahead of the team. This person also covers the team to the front and must be prepared for any surprise appearances by the suspects.
I have briefly mentioned part of this concept in another article, in which I stated that alternative team assignments would provide better forward cover for the team. With the advent of the ten-player patch, however, that position can be truly transformed into the Rolling Point position.
The Rolling Point is not necessarily appropriate for all situations. It works best when you are confronted with a hallway with several room openings, or a stairwell which the team will clear one floor at a time. Good examples in SWAT3 include:
- Hotel Carlyle: both the upstairs hall and the basement level
- LAX: when clearing the stairs to the tower
- Getts home: when clearing the hallway
- DBN-TV World: when clearing the upper and lower hallways and dressing rooms
- City Hall: when clearing the offices
- Monorail Cargo Centre: when clearing the offices
The Rolling Point is a position that will control the forward progress of the team and the momentum of the assault. If the Rolling Point gets bogged down, the entire assault can lose its momentum, resulting in the possibility of casualties to the team. This person must remain vigilant in his ability to cover the team against any threat from the front, while passing on vital information about what lies ahead.
One of the few gems of the Tactics CD released with the SWAT3 Tactical Game of the Year Edition is the set of QuickTime Movies of real life practice entries. While there are only a few of them, they do provide some insight to the attentive viewer. The images below were extracted from the movies and animations of the team entries.
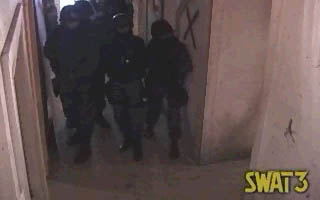
In the first image, we can barely see the feet of the team as they enter a hallway and begin to clear it. There is a doorway on the left of the image, which assaulters have just entered. In the centre is the Rolling Point man.

As the Rolling Point moves forward, the team follows. The point man calls out the openings, such as: "Doorway right!" or "Hallway left!" The assaulters then move into position to enter those areas. In the image below, we see the animation of the above picture. The Rolling Point is #5. Assaulter #6 just entered the room to the left of the above image, shown on the right of the animation below.
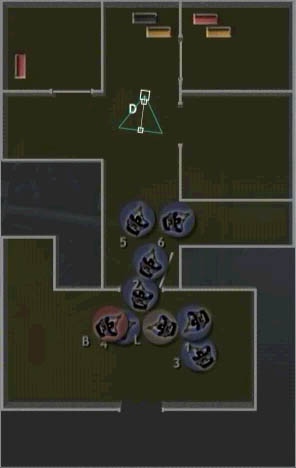
As the team progresses, they encounter a hallway on their left. The Rolling Point man stops and calls out the hallway, indicating assaulters needed for a "Snap left" manoeuvre. Simultaneously, they encounter a doorway on their right. The point also calls this out and will not proceed until the assaulters are prepared to move. In the image below, we see the point man in the centre and the "Snap left" team on the right of the image with the room entry team on the left.
Unfortunately, the team is somewhat vulnerable in this position. First, the hallway they are in is a tight space. Second, they are in the fatal funnel of the hallway on the right of the image. Third, standing three abreast makes them easy targets for any assailants who might appear ahead of them. The animation below demonstrates how they are stacked to make nearly simultaneous movements left, right and forward.

The unfortunate thing demonstrated in the above animation is that the officers who are about to move have little or no backup. They must be patient enough to wait for follow up officers to move in behind them, signal their readiness, and then make their moves. If #7 were to "snap left" without backup, he could be hurt entering the fatal funnel of the hallway or the fatal funnel of the adjacent doorway, and would leave the team's flank unsecured.
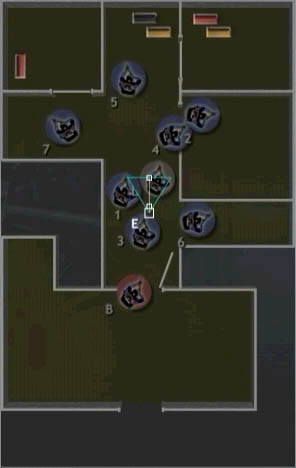
In the above animation, you see that #7 will go left, #2 will go right and #5 will remain in the Rolling Point position, moving forward. This is shown as they move in the image below.

This is something of a Catch 22. We see that #7 snaps left slightly ahead of the team entering the room on the left of the image. While this is necessary, clearing the hallway and providing the other assaulters safe ground to mount their assault of the room, it is also dangerous. #7 and #5, the Rolling Point, are in the fatal funnel of the room that is about to be assaulted. They have no idea what is on the other side of that door and so are taking a risk. Unfortunately, this is the best tactic available for clearing this type of intersection. The animation below demonstrates the above movements.

Above we see that #7 has moved without backup and stands in the fatal funnel of three threat areas. One to his front, from the hallway he is clearing; one to his right, from the room that is not yet cleared; one to his rear from the room that the other assaulters are about to enter. Below we see how the team has progressed beyond this position.

Here we see that the Rolling Point has moved forward and the assaulters on the left of the image have entered the room. This is also shown in the animation below.
This animation shows how a nine-man assault team entered and cleared this building using the Rolling Point. What you don't see is that they could have used their 10th man as a rearguard, ensuring that no threats approached the team from behind. In the above animation, the breacher is bringing up the rear, but is not facing the rear.
What this animation also shows is that assaulters #1 and #3 are not effectively covering the rest of the team. This is not necessarily their fault. The forward elements should have waited the extra 15 seconds necessary to allow #1 and #3 to enter the doorway at the rear and to get into position. As mentioned, #7 is vulnerable alone and #1 cannot effectively cover him from around the corner.
What this demonstrates is that while teams may be operating in the dynamic mode, they need to control their impulses and their adrenaline rush, exercising patience. This is the best way to prevent unnecessary team casualties.
The game
In order to test this idea, I recommend putting together a 10-man team and moving through one of the above-mentioned levels. I think that the best way to proceed would be to take the Blue team from the 1st element and make Blue 1 the Rolling Point with Blue 2 as the Rearguard. In this way the Rolling Point can take orders from the lead EL and the Rearguard can operate somewhat alone. The rest of the element would consist of three two-man assault teams and the two element leaders.
Perhaps the only way 10 men can operate together effectively would be to use Battlecom or Roger Wilco. In this way, communication between elements would be possible. I think that primary communication between the two Element Leaders and the Rolling Point and Rearguard with the rest of the team is crucial. The other assaulters could use the standard chat functions, resorting to voice communication when absolutely necessary.
The above could be shown graphically in the animation below.
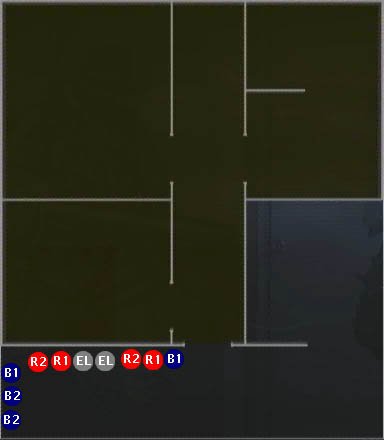
The above shows the order of the stack on the main entry of the building. The door can either be breached or the lock can be picked, depending on whether you are moving in stealth or dynamic mode.

As the team enters the structure, the Rolling Point man calls out the room on the right. The first assault team, in this case first element Red 1 and 2, prepare to enter and clear the first room.

As we see above, the Rolling Point man moves past the doorway, which we are assuming is closed for this exercise. This provides room for the Red assault team to stack on the door while providing cover for the team to the front.

Upon entry, Red 1 performs a crossover and Red 2 performs a buttonhookmanoeuvre. This allows these assaulters to dominate the room while quickly vacating the fatal funnel of the entryway.

After the Red assault team enters the first room, the rest of the element falls in behind the Rolling Point. They are ready to proceed down the corridor to the next objective.

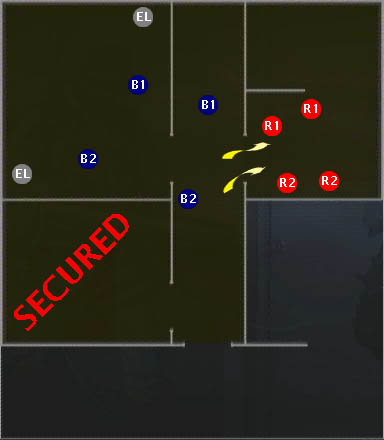
As they proceed down the corridor, the Rolling Point calls out two entry points that need to be covered. In order to execute this, two assault elements prepare to take one doorway each. The two element leaders act as an assault element while the second Red team moves up to the doorway on the right. Meanwhile, the first Red team has cleared the first room and is now coming out. They should announce their exit so that the Rearguard knows that officers and not suspects are coming out of the room. The first Red team falls in behind the rest of the element, as shown below.

Upon the ready signal, the two assault elements simultaneously enter the adjacent rooms. The lead officers in each team perform crossover manoeuvres while the secondary officers perform buttonhooks. This is a standard that all officers should employ when entering rooms. The rest of the element moves up to the entryways.
Notice the position of the Rolling Point in the above image. As the other teams breach the doors, he moves forward to a position outside the fatal funnel of both doors and continues to cover the team's forward area.

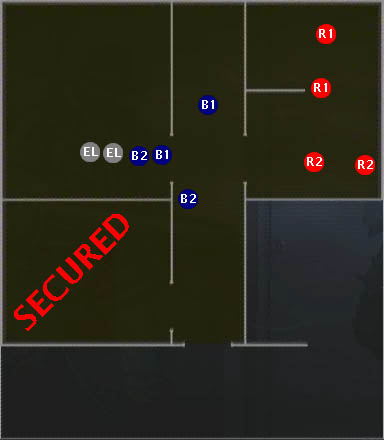
Above we see that not all rooms can be cleared by just the two men who initially enter. In this situation, the EL's call for additional officers and the second Blue team enters the room. Just as the first team, the first officer crosses over, while the second officer buttonhooks.

As the second Blue team assists in securing the room on the left, the second Red team calls for assistance in clearing the room on the right. The first Red team moves into position to provide assistance. Notice that the Rolling Point does not move forward until the element has cleared its area of responsibility behind him. The Rearguard also does nothing except cover the team's rear area.
The first Red team enters the room on the right to provide assistance to the second Red team. The Rearguard moves up to fill in the gap left by the team.
The second Blue team and the Element Leaders announce that their area is secured and prepare to exit. They will stack up behind the Rolling Point, as seen below.

Upon exiting the rooms, the element will fall in behind the Rolling Point. It is not important for the team to fall in in any particular order. It is best for fire teams (Red, Blue etc) to fall in together, but not necessary for Red to go first. Upon clearing their area, the Red teams prepare to exit and will fall in behind the element. The Rearguard, as always, will remain as the last man in the stack. Once completed, the element can move on to the next objective.
This drill is not going to be practical for every situation. Some areas will prove to be too small, or the layout too bizarre. Teams that play together often will become accustomed to their team playing style and will work accordingly. Hopefully this will provide a new view for some teams and give a new dynamic to work within.
[furryclan] are committed to shaking up "standard" SWAT 3 tactics. Real SWAT elements don't stroll nonchalantly up to every doorway and mirror it. Not once the cat's out of the bag. When the action kicks off these guys move fast. So do we.
Introductory notes
- A question of style - [GhostRider]
SWAT3 can be played in many different ways. Get on your Element Leader's side by knowing what he expects of you. - The real world versus SWAT3 - [GhostRider]
SWAT3 is a simulation with various differences and similarities vis-à-vis the real world that you should be aware of.
Movies
- The role of the rearguard - rearguard.wmv
A short introduction to the role of the rearguard.
Positions and assignments
- Team assignments - [_Zero_], [furrycat]
and [GhostRider]
An argument against a rigid team structure.
[GhostRider] talks about an alternative formation preferred by real-life SWAT elements. - Principles of movement - [GhostRider]
How these formations work in practice. - The Rolling Point - [GhostRider]
How the 10-man capabilities of SWAT3 v2.x make this formation feasible. - Rearguard - [GhostRider]
How to be a good rearguard.
Tactical discussions
- Dynamic mode - [_Zero_]
Why "I'm going dynamic" is not the same as "I am a rambo." - Two man room clearance - [furrycat]
The drill for a fast and furious room clearance. - Dynamic entry - [GhostRider]
[GhostRider] elaborates on safe room entry and describes a team clearance. - 30 suspect games - [furrycat]
These fun games test your tactic mettle more than you would think.